


Halloween STEAM Lessons With Creator Bots for K12 Educators
The best STEAM lessons do not always look like lessons. Sometimes they look like a tiny robot creeping across the floor, flashing orange and purple lights, then backing away when a hand gets too close.
Halloween is a rare classroom moment when curiosity is already switched on. Students arrive ready for mystery, costumes, stories, and surprises. That makes it a strong setting for real work in coding, engineering, design, math, and creative problem-solving.
With Creator Bots Arduino robotics kits, a Halloween activity can become much more than a seasonal craft. Students can write code, test electrical outputs, tune motor behavior, build 3D accessories, and explain design choices. The spooky theme gives the work a purpose students understand right away.
This guide shows how to turn Halloween STEAM Lessons With Creator Bots for K12 Educators into a practical classroom unit, whether there is one class period or a full week.
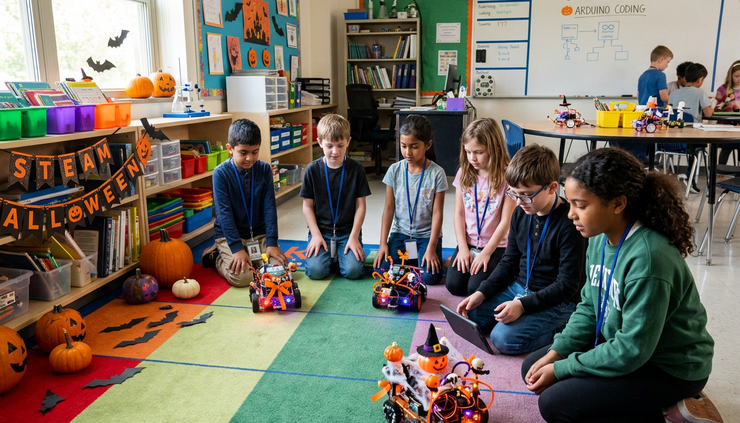
Why Halloween Is Actually a Perfect STEAM Teaching Moment
Halloween gives students a reason to care before the instruction begins. That matters.
Research on motivation often points to a simple pattern: learners engage more deeply when they feel ownership, see purpose, and can make meaningful choices. A Halloween robotics challenge checks all three boxes. The goal is clear, the theme is familiar, and the solution can look different from team to team.
A worksheet might ask students to demonstrate a loop. A Halloween bot asks them to make a light pattern that feels eerie, rhythmic, or surprising. Both tasks involve code. Only one invites design judgment.
That shift changes the level of thinking.
When students are asked to “make it spooky,” they have to ask better questions:
How fast should the LEDs blink?
Should the robot move smoothly or in short bursts?
What happens if it detects someone nearby?
How can a sound, light, shape, or motion create a mood?
How do we make the design safe, stable, and repeatable?
Those are engineering questions. They also lead naturally into coding decisions. A student who wants flickering jack-o’-lantern eyes may discover loops, random values, delays, and output pins. A team building a “ghost mode” robot may need conditionals and motor control before they even realize they are doing advanced programming.
That is the engagement equation:
A real challenge plus a creative brief often leads to deeper technical thinking than a direct instruction task alone.
Halloween STEM classroom activities work because the theme lowers the fear of failure. A robot that jerks, spins, flashes oddly, or behaves unpredictably can still fit the story. Students test, laugh, adjust, and test again. That cycle is the engineering process in a costume.
The Halloween Creator Bots STEAM Framework
A strong Halloween robotics unit needs more than decorations. It needs a clear structure, enough freedom for creativity, and simple checkpoints that keep teams moving.
Use this core challenge:
Make your Creator Bot do something spooky using code, motion, lights, sensors, or a custom-designed part.
That brief is open enough for creativity, but specific enough to assess.
Choose a 1-day or 1-week format
A one-day version works well as a focused coding lab. Students complete one task, test it, and share. A weeklong version lets teams move through brainstorming, prototyping, debugging, design, and reflection.
Format | Best use | Suggested flow |
1 class period | Introductory coding or seasonal enrichment | Mini demo, build challenge, quick test, gallery walk |
2 to 3 class periods | Coding plus engineering design | Plan, code, test, improve, explain |
1 week | Full STEAM project | Research mood and motion, program behavior, design an add-on, present final bot |
For a Halloween STEAM lesson plan K12 teachers can adapt, keep the same theme across grade levels but change the technical expectation.
Younger students might focus on patterns, cause and effect, and basic debugging. Middle-grade students can write and modify code. Older students can design sensor-based responses, tune variables, and document tradeoffs.
Scaffold for mixed ability levels
Robotics classrooms almost always include a wide range of confidence levels. The Halloween theme helps, but the structure matters.
Give every team the same mission, then offer challenge cards at three levels.
Support level
Students modify starter code, change blink timing, reverse motor direction, or decorate a printed template.
Core level
Students write or complete code for LEDs, motors, or a simple sensor response.
Extension level
Students combine multiple systems, such as lights plus motion plus sensor input, then explain how the code controls behavior.
This keeps everyone working on the same classroom story while giving each team the right level of stretch.
Assess the right things
A polished final robot is fun, but it should not be the only measure. Assess process and understanding.
Use a simple rubric with four categories:
Category | What to look for |
Coding | Uses loops, outputs, conditionals, random values, or sensor input correctly for the level |
Engineering | Tests, identifies problems, revises, and explains design choices |
Creativity | Connects motion, light, shape, or behavior to the Halloween brief |
Communication | Describes how the bot works using accurate STEAM vocabulary |
This connects well to common K-12 computer science and engineering practices, including algorithm design, testing, iteration, modeling, and communicating solutions.

Arduino Halloween Challenges by Difficulty
These challenges build from simple output control to autonomous behavior and sensor-based interaction. Each one can stand alone, or they can become stations in a larger Creator Bots Halloween challenge.
Beginner challenge with a Halloween LED sequence
Goal
Program the Creator Bot to blink orange and purple LEDs in a repeatable Halloween pattern.
Time
30 to 45 minutes
Core concepts
Digital output pins
`pinMode`
`digitalWrite`
Loops
`delay`
Pattern design
Start with a quick discussion of patterns. Ask students what makes a light sequence feel spooky. Is it slow? Fast? Uneven? Does it build suspense?
A simple version might alternate two LEDs:
```cpp
void setup() {
pinMode(3, OUTPUT);
pinMode(4, OUTPUT);
}
void loop() {
digitalWrite(3, HIGH);
digitalWrite(4, LOW);
delay(500);
digitalWrite(3, LOW);
digitalWrite(4, HIGH);
delay(500);
}
```
Once students get the basic pattern working, ask them to change one variable at a time.
Good prompts include:
Make the pattern feel like a heartbeat.
Create a warning signal.
Make it look like flickering candlelight.
Add a pause before the final flash.
The learning goal is not just “make lights blink.” Students should see that code controls timing, sequence, and mood.
Intermediate challenge with ghost mode movement
Goal
Program the Creator Bot to move in unpredictable ways, as if it is wandering like a ghost.
Time
45 to 90 minutes
Core concepts
Random values
Conditional logic
Motor control
Timing
Testing safe movement
This challenge introduces autonomy. The robot does not simply follow one fixed path. It chooses from a few movement behaviors.
Students can create a list of actions:
Move forward
Turn left
Turn right
Pause
Back up briefly
Then they use a random number to choose an action. The exact motor code will depend on the Creator Bots setup, so use the motor functions or pin controls taught in class.
A sample structure might look like this:
```cpp
int action = random(1, 5);
if (action == 1) {
// move forward
} else if (action == 2) {
// turn left
} else if (action == 3) {
// turn right
} else {
// pause
}
```
Before testing, set safety rules. Robots should move in a clear area, stay at low speed, and avoid stairs, feet, and loose cords.
This is a strong intermediate project because students can see the difference between fixed instructions and variable behavior. They also learn that “random” still needs boundaries. A spooky robot should surprise people, not crash into everything.
Advanced challenge with a sensor-triggered spooky response
Goal
Use an ultrasonic sensor or similar distance sensor so the Creator Bot reacts when something gets close.
Time
2 or more sessions
Core concepts
Sensor input
Conditional branching
Threshold values
PWM control
Motor response
Debugging with data
This is a true interactive Arduino Halloween project kids can build and explain. The bot waits until someone approaches, then responds with motion, lights, or both.
Example behavior:
If no one is close, the bot stays still and flickers dimly.
If someone comes within a set distance, the bot lights up, backs away, or spins.
If the object moves away, it returns to idle mode.
The most important teaching point is the threshold. Students need to decide what “close” means in code. That might be 10 inches, 20 inches, or another value that fits the classroom space and sensor setup.
Ask teams to record test distances and choose a trigger point based on evidence.
They can also use PWM to change intensity or speed. For example, the robot might glow brighter as a person gets closer, or the motors might speed up within a safe range.
This challenge feels magical to students, but the logic is clear: input comes in, code checks a condition, output changes.

The 3D Design Halloween Add-On Project
Robotics becomes even stronger when students design a physical part for a purpose. A 3D add-on turns the Halloween challenge into a full STEAM project that connects coding, design, math, and manufacturing.
Use this design brief:
Create a custom Halloween accessory that attaches to your Creator Bot and supports its spooky behavior.
The key word is “supports.” The part should do more than decorate. It should help tell the robot’s story or improve the way it works.
Add-on ideas that connect to engineering
A few strong examples include:
Pumpkin mount Holds LEDs behind a jack-o’-lantern face so the light pattern shows through.
Bat wing attachment Adds a silhouette that makes turns or spins more dramatic.
Spider leg add-on Extends the visual shape of the robot while staying light enough for safe movement.
Ghost shell Fits over the body without blocking wheels, boards, sensors, or wires.
Sensor frame Holds an ultrasonic sensor at the right angle for reliable detection.
Before students design, have them measure the robot. They should identify attachment points, clearance for wheels, and space around wires or sensors.
This creates natural math connections. Students use length, width, height, symmetry, angles, radius, and scale. They also learn that a design on screen must survive real use.
Teach design for manufacturing in simple terms
Students do not need to become expert 3D modelers to learn real design. Focus on a few usable rules.
Keep it printable
Avoid thin parts that break easily. Use simple shapes first.
Respect the robot
Do not block sensors, wheels, switches, charging ports, or wires.
Think about attachment
A part needs a way to stay on. Tape tabs, clips, slots, rubber band hooks, or screw holes can all work, depending on the kit and classroom rules.
Test the weight
If the robot slows down or tips over, the design needs revision.
The best part of this add-on project is that failure is visible. If wings drag on the floor, students know the geometry needs work. If a sensor mount points too high, the code may never trigger. This helps students see engineering as a cycle, not a one-time answer.
How to Run the Classroom Build Without Chaos
Halloween energy is real. It can help the lesson, or it can swallow the lesson. A few routines keep the room productive.
Start with a short demo, then stop. Do not over-explain every possible solution. Show one basic behavior, name the concept, and let teams build.
Set clear roles for each group:
Coder
Builder
Tester
Documenter
Students can rotate roles between rounds. This keeps one student from taking over the robot while others watch.
Use a visible test protocol:
Check wires and parts.
Upload code.
Test in the safe zone.
Record what happened.
Change only one thing.
Test again.
That “change one thing” rule is one of the best debugging habits students can learn. It keeps teams from creating five new problems while trying to fix one.
For classroom management, create a “robot graveyard” area where broken or misbehaving builds go for diagnosis. This makes problems feel normal instead of embarrassing. A bot that does not work yet becomes part of the story.

A Simple Assessment and Reflection Plan
End the unit with a short showcase. Each team demonstrates the bot and explains how it works. Keep the presentation brief and technical.
Ask each team to answer four questions:
What Halloween effect were you trying to create?
What part of the code controls that effect?
What problem did you find during testing?
What did you change to improve the design?
These questions help students connect creativity to evidence. They also make assessment easier. A project can look simple but still show strong thinking if the team can explain its decisions.
A final written reflection can be short:
One code concept I used was...
One engineering problem I solved was...
One design choice I would improve next time is...
One thing my robot does well is...
For older students, add a code annotation task. They can comment on three lines or blocks of code and explain what each part does. This checks understanding without turning the project into a long written report.
The Takeaway for a Strong Halloween STEAM Unit
A Halloween robotics lesson works because it gives technical skills a memorable purpose. Students still write code, test circuits, measure parts, debug behavior, and explain systems. They just do it through a challenge that feels alive.
Creator Bots make that possible because students can connect code to something they can see, hear, move, and redesign. A blinking LED becomes mood. A random turn becomes ghost behavior. A distance sensor becomes interaction. A 3D printed part becomes evidence of design thinking.
Start small if needed. One orange and purple LED pattern can teach loops and timing. A ghost mode movement challenge can teach randomness and motor control. A sensor-triggered reaction can bring input, logic, and output together in one unforgettable classroom moment.
The spooky part gets students in the door. The STEAM skills are what they carry out.


Comments